Dreamweaver-8 Basics
Dreamweaver-8 Basics
Dreamweaver 8 Basics

This page intentionally left blank
Contents
Dreamweaver 8 Basics
What is Dreamweaver? 4
Before you start with Dreamweaver. 4
HTML – Hypertext Markup Language 5
Dreamweaver 8 Start Page 6
The Dreamweaver 8 Designer Workspace 7
The Insert Bar 8
The Status Bar 8
The Document Toolbar 9
Starting the Web Site 10
Creating the Home Page 11
Adding Content to a Page 13
Format and Style 14
Layers 15
Creating More Pages 16
Adding Navigation 19
Test the Site 20
Post the website to a server 20
Helpful Keyboard Shortcuts 20
What is Dreamweaver?
Dreamweaver 8 is a powerful Hypertext Markup Language (HTML) editor used by professionals, as well as beginners. The program makes it easy for designers to create visually attractive, interactive Web pages without having to know HTML or JavaScript. However, Dreamweaver 8 enables the experienced professional to write and edit HTML using the code editor. Dreamweaver also gives the opportunity to create web pages and learn HTML coding as you go along, by giving you the option of a split screen with code and design.
If your department doesn’t already own a copy of Dreamweaver, you may talk to your IT Department about downloading a free 30 day trial from the Adobe website at http://www.adobe.com/products/dreamweaver/ .
Before you start with Dreamweaver.
There are a few things that need to happen before you start your web page in Dreamweaver.
The very first thing you need to know is your audience. Who is your target audience? What will they be looking for in your website? Will they be looking for entertainment, information, or education? What type of equipment do they use?
When you have that information, you need to plan out your website. What information will go on the home page? How many pages will your site have? How will you navigate around the pages? One of the best features about a web site is that they are not linear, but hypermedia. Websites are like a CD compared to an audio tape. They can be accessed in different sequences depending on what each person is looking for in your website. What images or other objects will you want included in the site? A good way to lay all this out is to use sticky notes and lay them out to see how your site will flow, and what your layout will be. You may then want to create a flow chart that will show how your pages will be linked.
Next, gather all your content, such as any documents, images, movies, scripts, etc that will
Once you have this information, you can begin to create your site by setting up the folders you will need for the site. Start with the root folder (the site folder) and everything else will need to go in this one folder. Even a small site must have a root folder and should also have an images folder and maybe even a content folder. Larger sites may have those folders and then go on to add other subfolders for each section of the web site. Each website must have its own root folder.
Because some browsers read text case sensitive it is a good idea to have all your file names in lower case letters. To make them more readable it is acceptable to use the underscore _ to separate words in your names. It is best for your home page to be named index.htm. Each website has a unique address or URL (Uniform Resource Locator). A browser will recognize index.htm as the home or opening page of your website. It is possible to locate a home page with alternate names, but the URL would have to be typed out including the home page name, including the file extension. In other words, to locate the home page named index.htm you would type in an address of http://www.website.com. But if your home page is named mysite.htm, you would have to type http://www.website.com/mysite.htm. Not a real big deal, but using the index file will make it more easily accessible to others. Also Dreamweaver automatically recognizes index.htm and you do not have to go through an extra step to designate the page as your home page.
HTML – Hypertext Markup Language
HTML is a set of codes that describe the appearance of web documents and all the objects on the page. Objects could be anything from text to images to movies. The HTML codes are called tags. The tags are enclosed with the < and > symbols so the programs reading them recognize that they are tags. Most items have an opening tag < > and a closing tag < />. For example <title> This is the title </title>. The tags signify the beginning of an item and the end of that item. Each item is called an element. Each element can have attributes and the attributes can have values. Values follow an equal sign and are in quotes. HTML tags are not case sensitive, so it doesn’t make any difference if you use upper or lower case letters, however lower case is the norm.
<ELEMENT ATTRIBUTE= “VALUE”> or, think of it this way:
<CAR MODEL=”CAMRY” COLOR= “RED”>
<SANDWICH BREAD=”WHEAT”>
All HTML documents are required to have certain elements.
<HTML> This designates the beginning of the document.
<Head> This section contains the document title, keywords, meta tags, scripts
<title> Document title </title>
</Head> This is the end of the Head section
<Body> This designates the beginning of the Body section
All the content of the page would be in the body section
</Body> This is the end of the Body section
</Html> This is the end of the HTML document
The World Wide Web is overseen by a not for profit group called the W3C (World Wide Web Consortium). They have hundreds of members from many countries and many companies. They are dedicated to providing Interoperability on the web so everyone has equal access to the web. From the W3C website:
The World Wide Web Consortium (W3C) is an international
consortium where Member organizations, a full-time staff,
and the public work together to develop Web standards.
W3C's mission is:
To lead the World Wide Web to its full potential by
developing protocols and guidelines that ensure
long-term growth for the Web. http://www.w3.org/Consortium/Overview
A couple of other items that need to be mentioned are download time and page resolution. The web site you are creating is meant for viewing. So to make it as accessible as possible it is a good idea to limit the amount of information on each page. Most viewers will not wait more than 8 seconds for a page to load. If it takes too long, they will just go somewhere else. The pages may need to be divided up into more pages with less information or images on each page or the images may need to be optimized (smaller file size) for the web.
There are various size monitors and some are set for a page resolution of 640 wide x 480. high. Viewers do not like to have to scroll side to side so many website developers limit the page size to less than 640 pixels, usually 600 pixels to be safe. Many of today’s monitors are likely to be set at a resolution of 800 x 600 so a web page of 750 pixels would be safe for that resolution. Studies have shown that the current most popular setting is the 800 x 600.
Dreamweaver 8 Start Page
The Dreamweaver 8 Designer Workspace
The Insert Bar


The Status Bar
The Document ToolbarStarting the Web Site
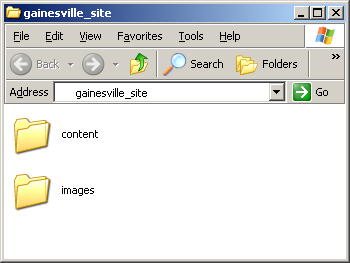
The first step in building a web site in Dreamweaver is to define the site. At this point, the site is already planned on paper. Now, create the folders and sub folders on the hard drive. You want to have something similar to folder below, where gainesville_site is the root folder and content and images are your subfolders. If you have all your images and content gathered, it is best to put it all in the proper folders at this time. Now we can define our site with Dreamweaver by specifying what the names of the folders are, and where they are located.
To define your site in Dreamweaver:
1. Open Dreamweaver 8.
2. Go to the menu and choose Site > Manage Sites.
3. Click New.
4. Choose Site.
When the site definition dialog box opens choose the Advanced tab.
(The basic tab will work, but it has more options than we need at this time.)
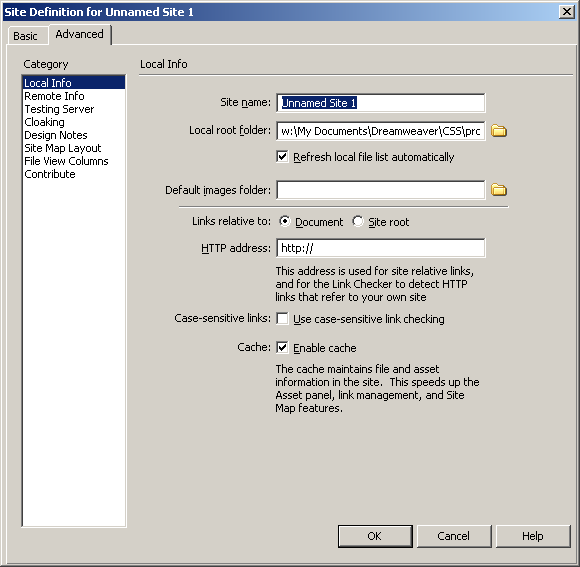
5. Choose Local Info.
6. In the Site Name Text box, type the name of your website (i.e. Gainesville).
7. In the Local Root Folder area, click on the folder icon. Navigate to where your root folder is stored. You should see the contents of your root folder
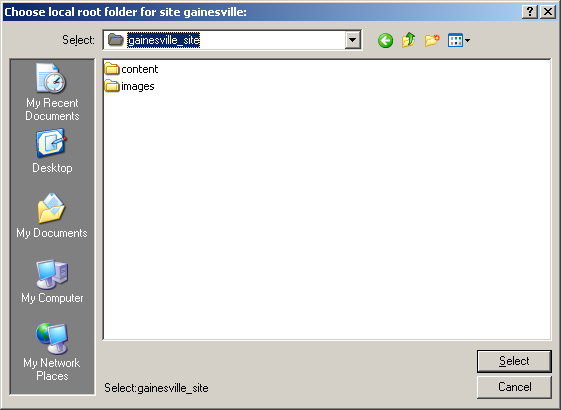
8. Click on Select.
9. Make sure Refresh Local File List Automatically and Enable Cache are checked.
10. Click OK. Click OK if the “initial cache” message pops up.
11. Click Done.
Creating the Home Page
Begin by creating a new page
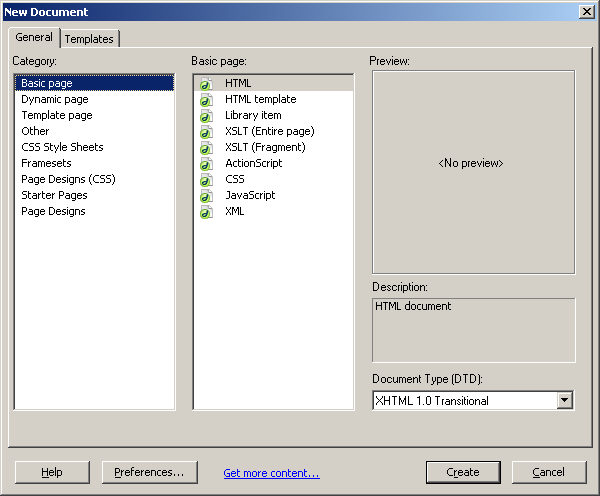
1. From the menu, choose File > New.
2. Choose a Basic page and HTML then click Create.
3. The next thing you do is save your page. It may look like an empty page, but if you look at the code view, you will see there is already information about your page. Go to File>Save on the Menu bar. Remember this will be the home page, so we want the file to be named index.htm.
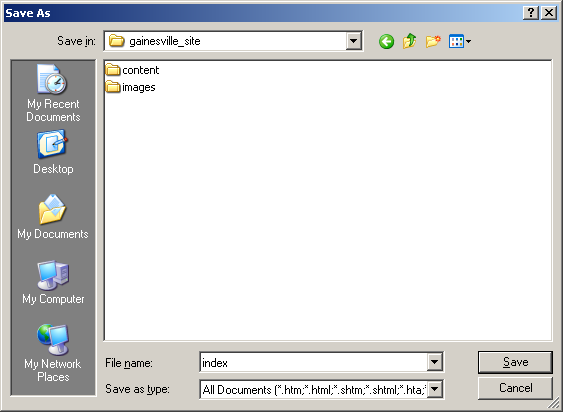
4. In the Document Toolbar type the title of your web page. Call this Gainesville Home Page or My Home Page. Unlike filenames, the title can contain spaces and/or characters.
5. Press Enter to apply the title to your home page.
6. Lets look at the Page Properties, by clicking on the button (labeled Page Properties) on the Property Inspector. It will open the dialog box and we will work on Appearance. (Another way to access Page Properties is to go to the Menu - Modify>Page Properties.)
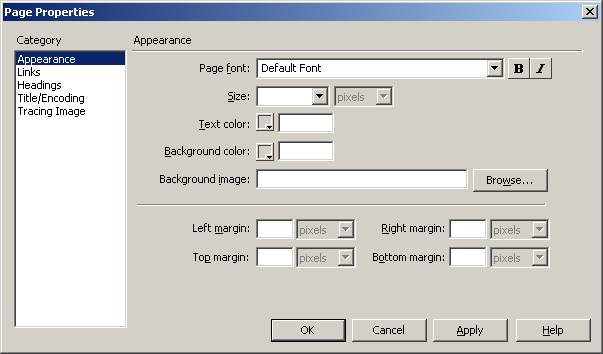
For this project we will be setting a background color for our page. Click on the small square next to Background color. The color picker pops up and gives the option to choose any color. Choose a color and press the Apply button. This will apply the background to the page and show what the page will look like. You have the option of changing it as many times as you want. This project is using color #FFFFCC. When you have the color you want press the OK button. (Although our monitors will theoretically display over 16 million colors, there are only 216 “Web Safe” colors. Those are the colors that will normally look the same in Internet Explorer and Netscape on PC’s or Macs. Web safe colors can be recognized by the hexadecimal value. Each web safe color will have 3 pairs of numbers consisting of 00, 33, 66, 99, CC, FF. Any time you are picking a color, you will see the hexadecimal value displayed. The cubes in the color picker are the 216 colors traditionaly considered to be web-safe. Most current monitors can see all 16 million colors so this is not as important as it once was.)
Set a left margin for the page. This will move the body of the page over so it is not up against the edge of the browser. We can use a % here that will change as the browser is resized.
As you can see on the Page Properties dialog box, there is also the option to set a background image. Dreamweaver tiles a background image by default so you need to be careful with the image you choose. You don’t want a background that is so busy it covers up your content.
For example:

8. Save the page. A good shortcut to remember for saving a file is CTRL+S.
Adding Content to a Page
1. There are several ways to layout a web page. The method we are using today will use layers. Another method would be to use tables.
2. Start by placing your cursor in the upper left corner of your page. Type the heading for the page. The Delete key, the Backspace key and Edit>Undo all will undo actions and remove items from your page.
3. Insert a paragraph break by pressing the Enter key. The enter key applies a paragraph break which gives white space above and below the text. (To move to the next line without that extra space, use shift + Enter.)
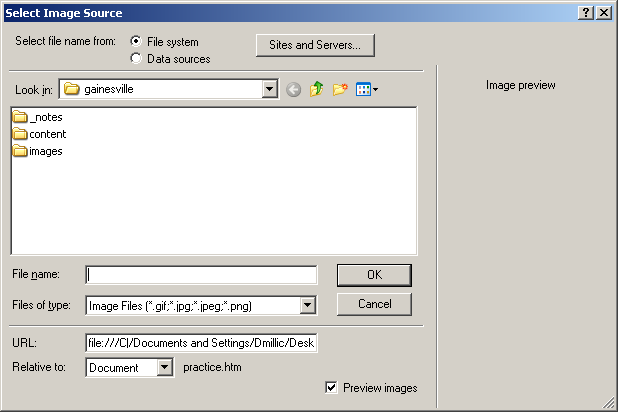
4. To enter an image, go to the Common Insert Bar, and choose the image button (it looks like a tree). The Image Source dialog box will open.
5. Choose your images folder. Choose the image you want and click OK.
Your image is now on the page where the cursor (insertion point) was located. The Image can be resized by clicking and dragging the small black squares on the image bounding box. It can also be resized by typing in the size in the Property Inspector. The best practice however, is to have your picture sized properly before inserting it into your page by using a graphics program.
6. Enter an alternate text for your picture. This is a description that will display on rollover, but will also display if the picture does not load properly or if the person viewing your page does not have graphic capabilities, or for those “reading” the page using a screen reader. This is one of the accessibility options available, and is a good practice. Enter the description of your image in the Alt text box in the Property Inspector.
7. To direct your audience to other websites, make some hyperlinks. Type something descriptive such as Go to the City of Gainesville website
8. Select the words “City of Gainesville”. In the Property Inspector, type in the full URL of the link for example http://www.cityofgainesville.org/ and press the Enter key. This will enter a hyperlink in your document and will show up underlined. (The color of the hyperlink as well as many other options can be changed by using Cascading Style Sheets (CSS) which will be discussed in later workshops.)
9. The link is now a working link and that is all that needs to be done. However, in the Target dropdown box there are choices to make the link open in a new browser. Choosing _Blank in the target drop down will make the link open in a new browser window.
10. Press Enter to make another paragraph and repeat the hyperlink process for the remaining links.
Format and Style
Now that the content is on the page we can give it some format and style it to look better.
Select the Heading text, and change the way it looks by changing items in the Property Inspector.
Format: Heading 1
Size: None
Color: Orange (#FF9933) or any color of your choice
Font Style: Verdana, Arial, Helvetica, sans –serif
This is a font family. By choosing a group of fonts, a browser will look at the first font and if that is not available, it will go down the list until it finds one that is available.
Alignment: Click the Align Left button. Click somewhere else on the page to
Deselect the text.
Dreamweaver 8 creates a style for this heading, so you can use that style to have
consistency with the other pages in the site.
Use the Property inspector to format other areas of text. Make the image caption smaller.
In the Property Inspector there is a Style dropdown box. Each time a style is applied to an object or text, Dreamweaver creates a new style. These styles are placed in the head section of the HTML document, and can be reused in other places of the document. For example, if you style a section of text to be blue and italic and then you want to style another section of text to look the same you could select the new text and go to the style in the dropdown box and apply the style that was used on the earlier blue italic text. If you are going to use the styles, it might be a good idea to use the dropdown box and rename the styles so you know what the style contains. Dreamweaver names them style with a number ie: Style2, Style 4. The styles will be listed in the CSS Styles panel. A better option for styling your pages would be to use Cascading Style Sheets (CSS). Check out the handout for the CSS class at http://training.health.ufl.edu/handouts.aspx#internet .
To insert a line or Horizontal Rule, place your cursor where you want the line to be. On the HTML Insert Category, click on the Horizontal Rule button (looks like a page with a small blue line on it). In the Property Inspector change the height to 2 pixels and uncheck shading.
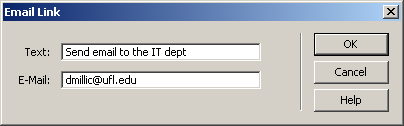
To add an email link, place your cursor where you want the link to be. Remember you can align your text in the Property Inspector box. Type in the wording you want such as Send email to the IT training department. Select your text, and then choose the Email button (envelope) on the Common Insert bar. Fill in the actual email address and click OK. That creates an email link that will open the email client with the address already in place.
Layers
The page is beginning to look like a real web page, but it is a little one sided. One way to place text in a specific place on the page is to use layers. Choose the Layout Category on the Insert Bar. Make sure Standard is the chosen mode. Choose the Draw Layer button.
When you put the cursor on your page, it changes to cross-hairs. Now you can click and drag to create a layer where you want to put your text. The layer can be resized and moved to place it exactly where it is needed.
To add text, you could just type in your text, or if you have the text in a file, you can open the file, copy and paste it into the layer. The “Facts” to go in this page are in a text file. Locate the file in the files panel. Double click to open, copy and paste. The text can be formatted in the Property Inspector as needed. (If you want your text to be a list with bullets or number, select the text; go to the Text Category on the Insert Bar. Choose ul for a bulleted list or choose ol for a numbered list.)
Add another layer to add the date feature. When the layer is ready, go to the Common Insert Bar and choose the date feature. If you want the date can be automatically updated each time you modify your page.
Save the file. Either File > Save or CTRL + S. On the open document tab if a * is showing it means the page has not been saved since changes have been made. Remember it is always best to save your work continually as you go along.
Preview the page in a browser. On the Document Toolbar, choose the world icon and choose the browser you want to preview the page. If possible it is always best to preview in as many browsers as possible as some browsers do have their own default settings and may display your page differently. Test the hyperlinks and the email link (Don’t send an email, just test to see that it opens the email client).
Creating More Pages
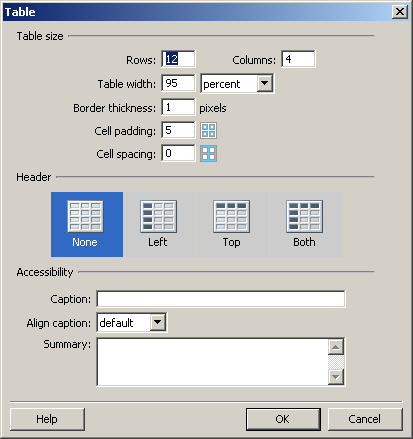
The second page will have a table in it to organize information. Tables are set up with rows going across the page and columns going down the page. Cells make up the table and have properties called cell spacing which is the space between each cell and cell padding which is the space from the cell wall to the information placed inside the cell.
1. Create a new blank page by going to File > New > Basic > HTML > Create. Give it a title. Give it the same background color as the home page. Save the page. This will be our Services page. Type and format the Heading (Gainesville Local Services) on the page. An alternate way to create more pages is to open your home page (index.htm) delete the content not needed on the succeeding page and then use SAVE AS to save the page with a new name.
2. With your cursor at the end of your page heading, press Enter to create a new paragraph. Go to the Layout Category of the Insert bar. While in Standard mode, choose the table button.
3. When you choose the table button the Table dialog box pops up. Enter the number of rows (12) and columns (4). If you do not want a border to show, you would enter 0 in the border text box. For this project we will set the border to 1 and set Cell spacing to 0 and Cell padding to 5. Set the Table Width to 500 Pixels. If necessary, the table properties can be changed in the Property Inspector at any time. Also the width and height can be changed by clicking and dragging the borders.
4. Type in the information from the services file. Move around the cells just as you would in any spreadsheet. The cells may change size as you type. Get all your info in the cells and then if you need to you can resize at that time. Alternately if you have the file already created and in your folder it can be dragged and dropped into your page.
5. Save the page. Preview the page in a browser.
The next page will incorporate a table to arrange images.
1. Create a new blank basic HTML page. Save the page. Give it a title (In the Document toolbar).Give it the same background. This will be our City Facts page. Type and format the Heading (Gainesville City Facts) on the page. Press enter to make a new paragraph.
2. Find the cityfacts file in the content folder. Copy the file and paste it into the page. Check the formatting of the text. Remember Enter creates a new paragraph, Shift+ Enter just moves to a new line, Delete or Backspace will delete line breaks or paragraph breaks.
3. Place the cursor under the text (new paragraph). On the Common Insert bar, choose the table button and insert a table with 2 rows and 3 columns. Give it 10 pixels of cell padding, and make sure the border is set to 0. Click OK. This table will hold images. By putting them in a table it will line them up evenly.
4. Click in the first cell. On the Common Insert bar, click the image button. When the Select image source dialog box comes up, locate the images file and select the image to be placed on the page. Click OK and the image is inserted. If you want a border on the pictures, type a number in the border box in the Properties Inspector. The larger the number, the wider the border. Remember to add the Alt text. Click in the next cell in the first row and insert the next picture. Repeat for the last picture. (An alternate way to enter pictures in the table is to locate them in the files panel and click and drag them into place.)
5. Click in the first cell of the second row and give the picture a caption. To make the caption a hyperlink, type the URL in the link text box in the Property Inspector for the location represented by the picture. Repeat for the other two pictures. (To save time, look in the links file and copy and paste the links.)
6. Save the page. Preview in the browser. Test the links to make sure they work.
The last page in the site will be a map page with a rollover image. A rollover image is two images located in the same space. One image is the base image. Then, when the mouse is over the image the second image shows. Move the mouse and the first image takes its place again.
1. Create a new blank basic HTML page. Save the page. Give it a title (In the Document toolbar). Remember to set the background color. This will be our Map page. Type and format the Heading (Gainesville Driving Directions) on the page. Press enter to make a new paragraph.
2. In the Common Insert bar click on the small triangle next to the image button. In the drop down box, choose Rollover Image.

3. Use the browse buttons to locate the images. Select the images to go on the page. The standard nonrollover picture is the Original image. Also check Preload Rollover Image to make the image cache in the browser so the picture will load quickly. As with all images, type in an alternate text. Click OK. Save the page and preview in the browser. Test the rollover image to make sure the pictures swap out as the mouse rolls over the image.
4. Add a layer just as you did on the Home page and type in the driving directions. Or find the directions file and copy and paste.
Adding Navigation
Once you have a group of web pages you want to make sure that anyone looking at the pages can maneuver through your site at will. We will use a table to add a navigation bar.
1. Open your Home page. Insert a table with 1 row and the # of columns to match the number of pages in your site. Use 0 for border, cell spacing and cell padding. Set the width at 95%. Click OK.
2. The table is on the page and selected. While it is still selected, use the Property Inspector to align the table on the page by choosing Center from the Align drop down box. If the table is not selected, it can be selected easily by clicking on the tag in the Tag Selector on the Status bar.
3. Click in the first cell and drag your cursor through the cells to select the whole row. Click on the Align Center button on the Property Inspector to align the contents of all the cells to the center.
4. Type Home in the first cell. Since we are on the home page we will not need a button for this page.
5. Click in the next cell. Go to the Common Insert Bar and choose the Media: Flash button to insert a navigation button.
6. The Insert Flash Button dialog box will open.
In the style section, choose a button. It shows what the button looks like in the sample box.
In the Button text box type the page name. Set font if you want.
Click on the Browse button to locate the page you are linking to. Select the page and click OK.
In the Save as area, browse to the root folder, and naming your button a logical name, save the button there.
Click OK to close the Flash button box.

7. Repeat steps 5 and 6 until all of the buttons are set. Save the page and preview it in the browser. Now we need a way to get back to the home page and move around the other pages.
8. On the Home page select the Navigation table by clicking in the table and then selecting the table tag in the tag selector in the status bar at the bottom of the page. Copy the table (Edit> Copy or CTRL+C). Open your other pages and paste the table there. Click in the first cell (Home). Delete the text, choose Insert>Media: Flash Button and follow step 5 to create the link to the home page. Delete the button that links to the current page you are working on and type the name of the page in that cell. Repeat this step for each of your other pages until all the pages are linked to each of the other pages.
Test the Site
Before you put your site on a server it is best to test it on your local machine.
1. Open your Browser (Internet Explorer, Netscape, Mozilla, etc.)
2. From the browser Menu bar choose File > Open. Locate your root folder and choose
your home page (index.htm). Your site should open in the browser.
3. Test all the links, both the links to your pages as well as the external links to other sites.
test to make sure the email links works. (Don’t send email; just make sure it brings up the email client.) Remember to get back to your site from other sites you may have to use the browser’s Back button.
Post the website to a server
There are a few ways to get the website “live” and viewable by the public.
Many departments have a public folder that will allow you to copy your website in the folder and get a URL so anyone can navigate to the website with a browser.
Another way to post the site is to use FTP. That is a File Transfer Protocol. FTP is a process where the files are uploaded to a server and are then available for viewing.
Check with your department IT person as to how this would be done in your department.
Once you have a folder on the “live server” you can go to Site > Manage Sites to edit the remote site information.
Many email servers allow a certain amount of space for personal websites.
Helpful Keyboard Shortcuts
Another shortcut is to use the mouse right click. When you are working with an item on the page, if you right click on the item you will get a context menu. This has many commonly used options for that particular item.
Comments
Post a Comment